Writing Your Own X-11 Framework Basics (Part 4) A Polished Button
Writing Your Own X-11 Framework Basics (Part 4) A Polished Button


In Part 1 we looked in detail at the X-11 calls in relation to graphics. We simply wanted full control back of our widgets to make a button or a interface any way we wanted, and thus it spawned this project. In Part 2 continued where we were able to make a couple very basic but completely working 'buttons'. We then wanted to make them stylish thus in Part 3 we made a style manager that could track styles by name. Now our goal in Part 4 is just a simple polished button like you would see in Lazarus pascal,
Tbutton mybutton;Because X-11 is basic it cannot actually draw a rounded button out of the gate - so we will need to construct one, a bit of planning suggests the following:
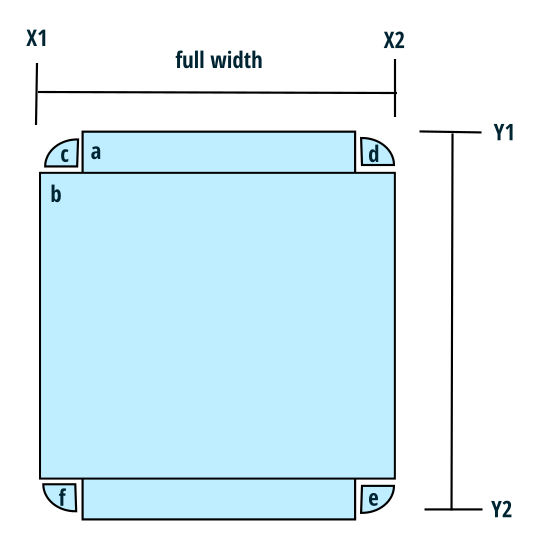
- Rectangle a, and b, will simply be draw overlaps, followed by 4 arc draws c, d, e, f.
- 4 line draw will make the outside, with 4 arc-lines to make the boundary.
Typically when you are mangling these it is illustrative to code it as simply as you can, allowing for ample step debugging, in other words - code clearly and concisely you can always make your mysterious Gordian knot code later.
        XSetForeground(display_, gc_, style_.fillColor_);

        //region Region Rectangle A
        int a_x1 = x1_ + style_.radius_;
        int a_width = x2_ - x1_ -  2 * style_.radius_;
        int a_y1 = y1_;
        int a_height = y2_ - y1_;
        XFillRectangle(display_, window_, gc_, a_x1, a_y1, a_width, a_height);
        XFlush(display_);
        // endregion

        //region Region Rectangle B
        int b_x1 = x1_;
        int b_width = x2_ - x1_;
        int b_y1 = y1_ + style_.radius_;
        int b_height = y2_ - y1_  - 2 * style_.radius_;
        XFillRectangle(display_, window_, gc_, b_x1, b_y1, b_width, b_height);
        //endregion
This gives us when we call the draw function the following, which we have deliberately over sized it - so we can see what it looks like.

Once we are happy we can fold the variables back into a single function call as:
        //Rectangle A
        XFillRectangle(display_, window_, gc_, x1_ + style_.radius_, y1_, x2_ - x1_ -  2 * style_.radius_, y2_ - y1_);
        //Rectangle B
        XFillRectangle(display_, window_, gc_, x1_, y1_ + style_.radius_, x2_ - x1_,  y2_ - y1_  - 2 * style_.radius_);
We repeat this process and the entire fill with the 4 arcs looks like this :
        XSetForeground(display_, gc_, style_.fillColor_);

        //Rectangle A
        XFillRectangle(display_, window_, gc_, x1_ + style_.radius_, y1_, x2_ - x1_ -  2 * style_.radius_, y2_ - y1_);
        //Rectangle B
        XFillRectangle(display_, window_, gc_, x1_, y1_ + style_.radius_, x2_ - x1_,  y2_ - y1_  - 2 * style_.radius_);
        //region Arc C Top Left
        XFillArc(display_, window_, gc_, x1_, y1_, 2 * style_.radius_, 2 * style_.radius_, 90 * 64, 90 * 64);
        //region Arc D Top Right
        XFillArc(display_, window_, gc_, x2_ - 2 * style_.radius_, y1_, 2 * style_.radius_, 2 * style_.radius_, 0, 90 * 64);
        //region Arc E Bottom Right
        XFillArc(display_, window_, gc_, x2_ - 2 * style_.radius_, y2_ - 2 * style_.radius_, 2 * style_.radius_, 2 * style_.radius_, 270 * 64, 90 * 64);
        //region Arc F Bottom Left
        XFillArc(display_, window_, gc_, x1_, y2_ - 2 * style_.radius_, 2 * style_.radius_, 2 * style_.radius_, 180 * 64, 90 * 64);

        XFlush(display_);
Now it is producing a nice outline:

Were almost there - now we just need to add in the 4 line-outline, like so:
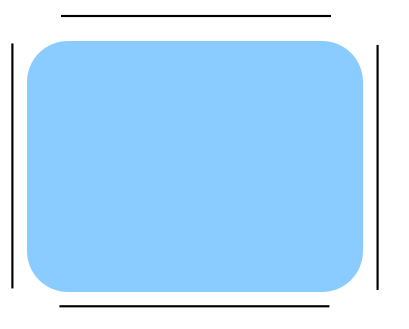
We also need to set our line width, we could of done it inside the style class, but we can really do it here, so:
        //Set Line Color
        XSetForeground(display_, gc_, style_.lineColor_);
        unsigned long valuemask = GCLineWidth;
        XGCValues gc_values;
        gc_values.line_width = style_.lineWidth_;
        XChangeGC(display_, gc_, valuemask, &gc_values );

        // 4 Line Bars
        XDrawLine(display_, window_, gc_, x1_ + style_.radius_, y1_, x2_ - style_.radius_, y1_);
        XDrawLine(display_, window_, gc_, x2_, y1_ + style_.radius_, x2_, y2_ - style_.radius_);
        XDrawLine(display_, window_, gc_, x1_, y1_ + style_.radius_, x1_, y2_ - style_.radius_);
        XDrawLine(display_, window_, gc_, x1_ + style_.radius_, y2_, x2_ - style_.radius_, y2_);
Now we have out 4 outlines

Finally we code up the arcs, which is simply the outline fill arcs, repeating and changing XFillArc to XDrawArc so we get:
    // 4 Arcs
    XDrawArc(display_, window_, gc_, x1_, y1_, 2 * style_.radius_, 2 * style_.radius_, 90 * 64, 90 * 64);
    //region Arc D Top Right
    XDrawArc(display_, window_, gc_, x2_ - 2 * style_.radius_, y1_, 2 * style_.radius_, 2 * style_.radius_, 0, 90 * 64);
    //region Arc E Bottom Right
    XDrawArc(display_, window_, gc_, x2_ - 2 * style_.radius_, y2_ - 2 * style_.radius_, 2 * style_.radius_, 2 * style_.radius_, 270 * 64, 90 * 64);
    //region Arc F Bottom Left
    XDrawArc(display_, window_, gc_, x1_, y2_ - 2 * style_.radius_, 2 * style_.radius_, 2 * style_.radius_, 180 * 64, 90 * 64);

Voila! Finally the last step is to write the text inside the button. This can be tricky because we need to know the extents of the font. So:
One More Step Writing the OK or Button Text
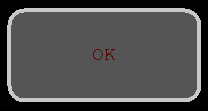
Finally we want to look at writing the Text Fill Button. Thusly this block should suffice:
        // Draw centered button text using the active style
        if (style_.font_)
        {
            XSetFont(display_, gc_, style_.font_->fid);
            XSetForeground(display_, gc_, style_.text_color_);

            int text_width = XTextWidth(style_.font_, text_.c_str(), static_cast<int>(text_.length()));
            int text_x = x1_ + ((x2_ - x1_) - text_width) / 2;
            int text_y = y1_ + ((y2_ - y1_) + style_.font_->ascent - style_.font_->descent) / 2;

            XDrawString(display_, window_, gc_, text_x, text_y, text_.c_str(), static_cast<int>(text_.length()));
        }
On Pause ATM
- We will continue this in a short bit, however a PILE of new models are in town so we are back to reviewing them!