GPU Driver Secrets / Bench-MaXXing / Power Balancing / Performance Metrics and Tensor Pinning! Getting the Most out of your Nvidia GPU.
We look at everything to get the MAX out of your GPU, including power balancing, and tensor pinning!

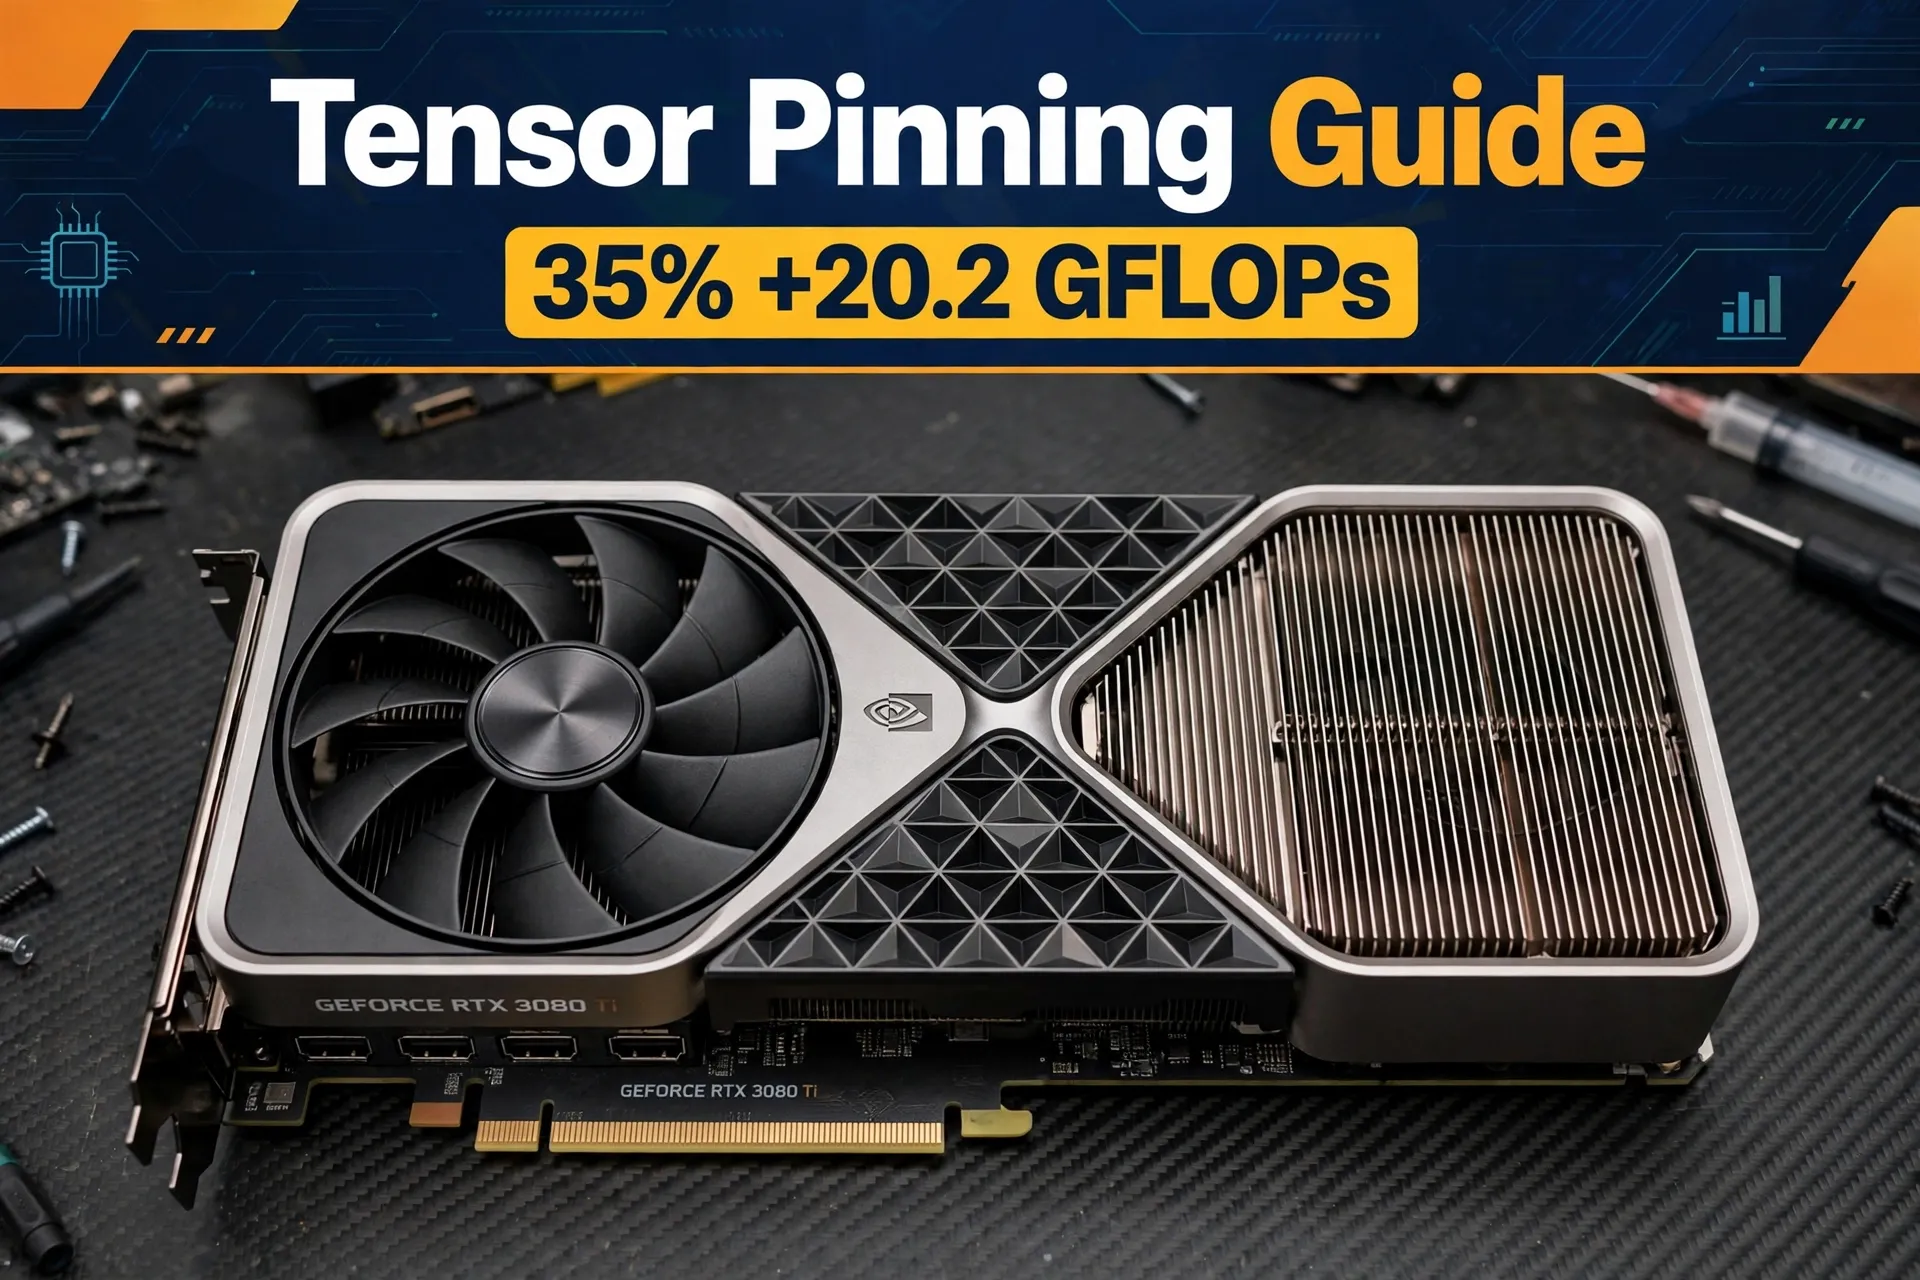
Tensor Pinning is all the rage, imagine getting absolutely incredible boosts in BF16 compute by finding a secret setting in your driver. But to pull it off means you really have to know what is going on inside your GPU, your drivers, even the lower level initramfs , and to properly benchmark it. So we have walked through all the steps for you! In the beginning we wrote a very cursory guide marking down some of the sites and git repositories that had discussed it.
 thinkmeltprotonmail.com

Part A. Driver Installation Review
Setting up and configuring a Nvidia GPU and it's drivers is its own process - especially in Linux! Once you finally get past all the gotchas it is very good to document what works, what doesn't and what is fud.
We have two guides that go over driver installation for reference we have:
thinkmeltprotonmail.com
And a cursory look at kernel driver installation, namely:
thinkmeltprotonmail.com
Recently we can also see that how nvidia-smi has recently changed it's driver labels:
- NVIDIA-SMI: 580.178.04 / Driver Version: 580.178.04 / Cuda Version 13.0
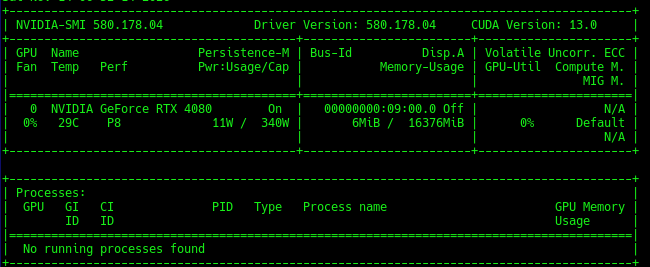
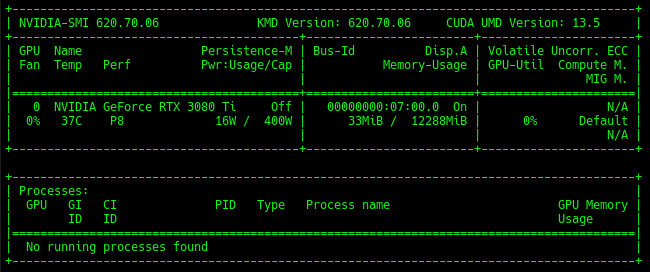
Is now changed on the newer drivers for nvidia-smi to:
- NVIDIA-SMI: 620.70.06 / KMD Version: 620.70.06 CUDA UMD Version:13.5
Understanding Nvidia Driver Layers
This diagram is atypical of how the Nvidia driver layers exist,
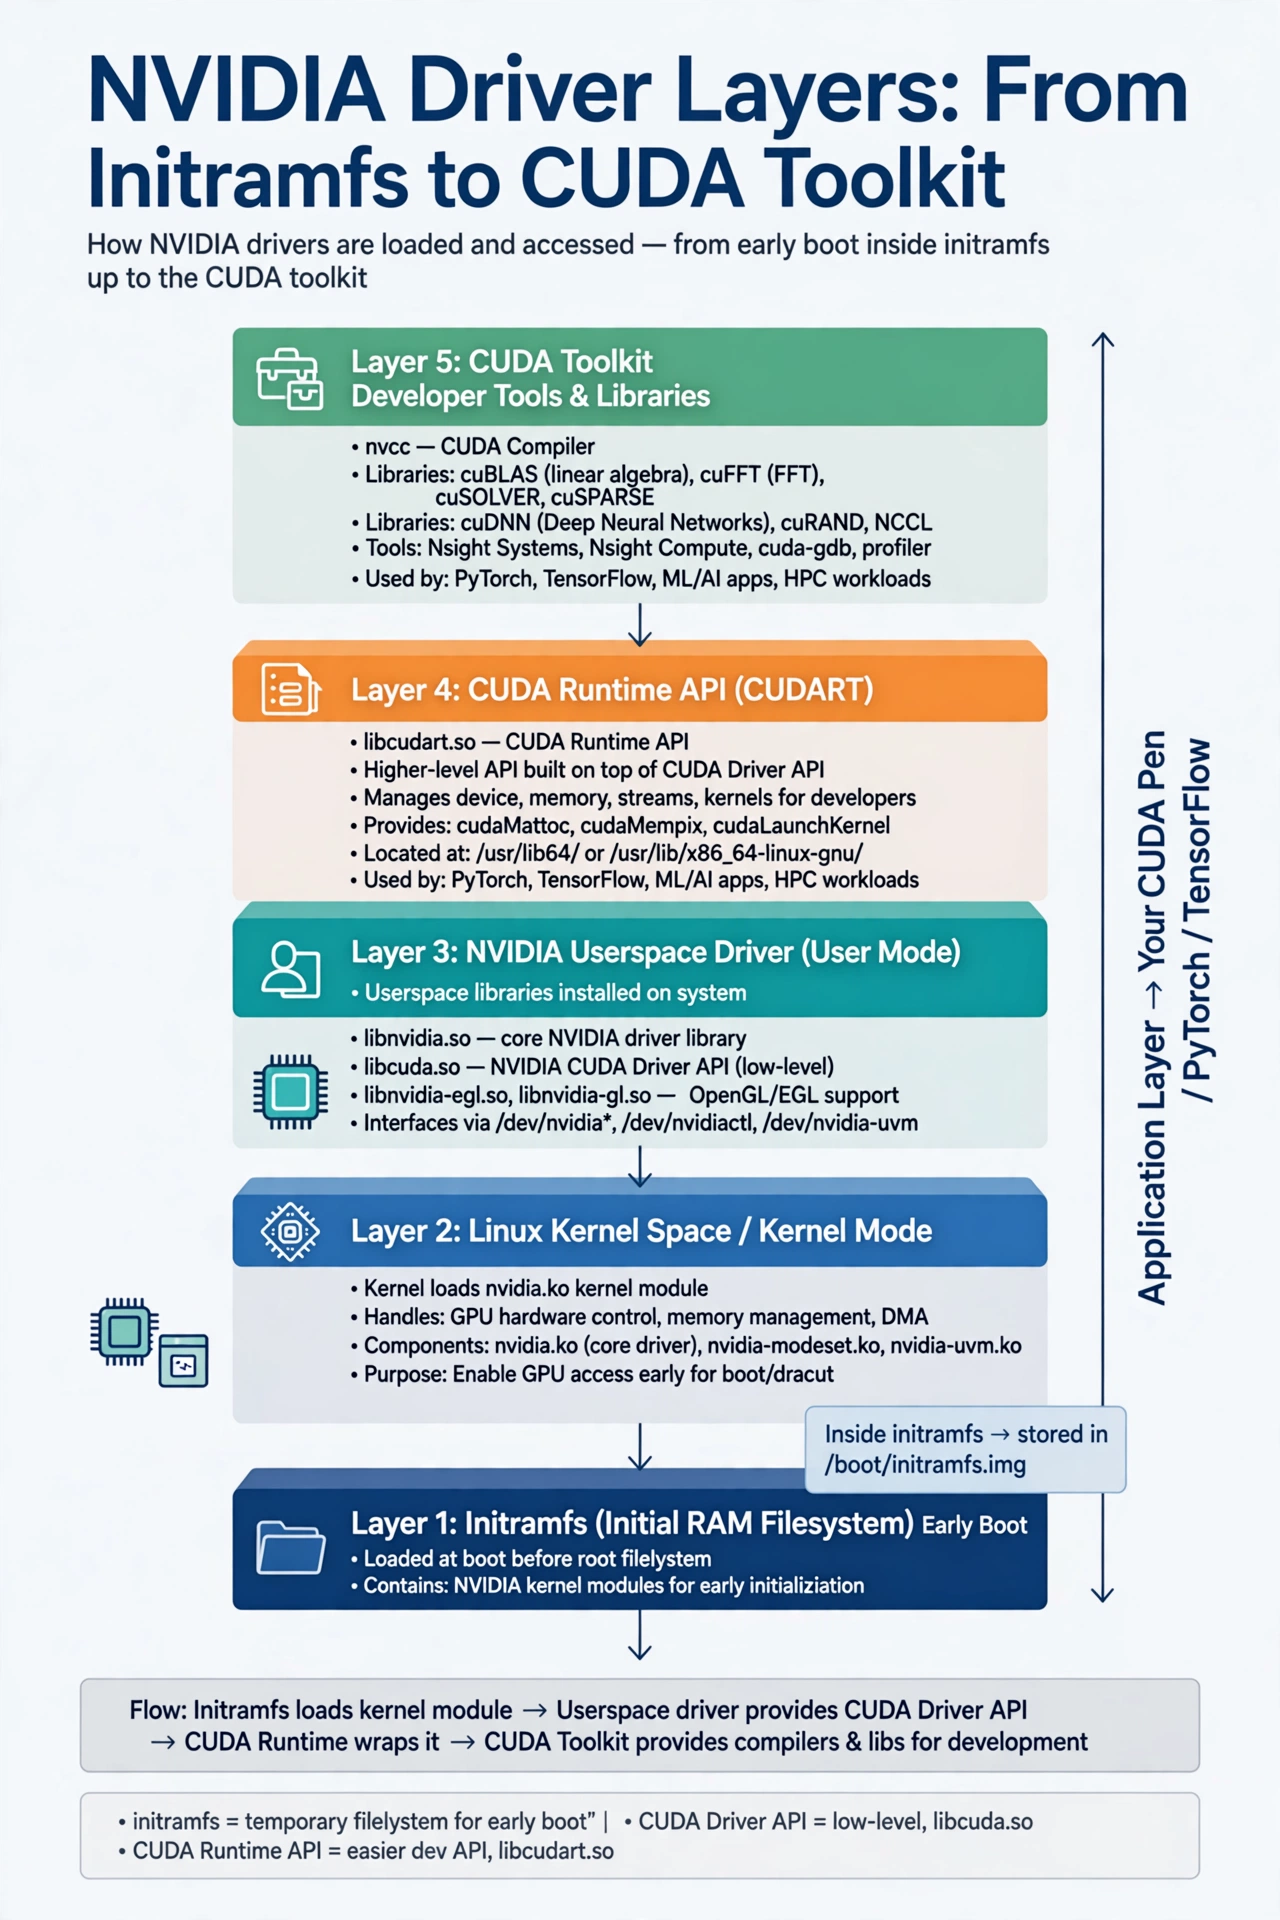
Examining Layer 1 - 4 The initramfs Layer / Clean Driver Installation Layer
The initramfs file is the lowest level file just after your BIOS firmware. Because the GPU needs privileged access some of the drivers need to reside inside the initramfs file. To examine which initramfs is your active one, can be done simply by:uname -r
c@192.168.1.4:~$ uname -r
7.2.11+parrot7.1-amd64
We can then examine the drivers for the corresponding Nvidia .bin files that are built into the initramfs with:
sudo lsinitramfs /boot/initrd.img-7.2.11+parrot7.1-amd64 | grep nvidiaWe will quickly see that the .bin files for various chip families reside here:
usr/lib/firmware/nvidia/tu106/sec2/image.bin
usr/lib/firmware/nvidia/tu106/sec2/sig.bin
... snip
usr/lib/firmware/nvidia/tu117/gr/fecs_sig.bin
usr/lib/firmware/nvidia/tu117/gr/gpccs_bl.bin
Most of these are the generic nouveau drivers and they never actually load, residing there simply for higher-compatibility reasons. To see which one is active, we do:
lspci -k | grep -A3 -E 'VGA|3D'
07:00.0 VGA compatible controller: NVIDIA Corporation GA102 [GeForce RTX 3080 Ti] (rev a1)
        Subsystem: eVga.com. Corp. Device 3967
        Kernel driver in use: nvidia
        Kernel modules: nouveau, nvidia_drm, nvidia
If you have conflicts of the actively designated kernel level drivers from a bypass install caused by a --no-kernel-modules installation, for example:
sudo sh ./NVIDIA-Linux-x86_64-620.70.06.run --no-kernel-modulesThis then becomes enlightening to the true Gremlins affecting driver installation, not only should you clean out the higher level drivers, but you should be blocking the display-manager entirely, as it loads at initramfs run time, thusly:
sudo systemctl isolate multi-user.target   # kill the GUI first
sudo nvidia-uninstall                      # removes a previous .run install cleanly
sudo dkms remove nvidia --all 2>/dev/null; sudo dkms status
# Fedora / RHEL / RPM Fusion
sudo dnf remove '*nvidia*' akmod-\* kmod-\* xorg-x11-drv-nvidia\*

# Debian / Ubuntu instead:
sudo apt purge '^nvidia.*' '^libnvidia.*' && sudo apt autoremove
# Fedora / RHEL / RPM Fusion
find /lib/modules/$(uname -r) -name 'nvidia*.ko*'
grep -rE 'nvidia|nouveau' /etc/modprobe.d/ /etc/modules-load.d/ /etc/dracut.conf.d/ 2>/dev/null
sudo systemctl set-default multi-user.target   # optional, undo later with graphical.target
sudo reboot

# after reboot, in a TTY:
lsmod | grep -E 'nvidia|nouveau'               # must be empty
lspci -k | grep -A3 -E 'VGA|3D'                # "Kernel driver in use:" should be gone
This should finally allow a clean full sudo sh ./NVIDIA-Linux-x86_64-620.70.06.run
Layer 5 - Cuda Toolkit Version Matching
Once you have verified that you have the Nvidia drivers installed with nvidia-smi as in:
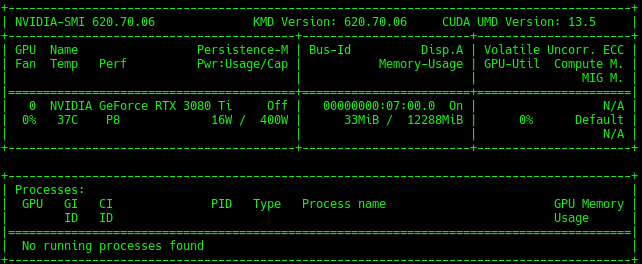
The highest supported cuda-toolkit will be defined by the top-right as in: CUDA UMD Version: 13.5 - so one simply matches it:
# nvidia-smi says CUDA 13.0
sudo apt install cuda-toolkit-13-0

# nvidia-smi says CUDA 12.8
sudo apt install cuda-toolkit-12-8

# nvidia-smi says CUDA 12.6
sudo apt install cuda-toolkit-12-6

# nvidia-smi says CUDA 12.4
sudo apt install cuda-toolkit-12-4

# nvidia-smi says CUDA 11.8
sudo apt install cuda-toolkit-11-8
In case nothing shows up you can add the keyring:
DIST=$(. /etc/os-release; echo $ID$(echo $VERSION_ID | tr -d .)) # e.g. ubuntu2404
wget https://developer.download.nvidia.com/compute/cuda/repos/$DIST/x86_64/cuda-keyring_1.1-1_all.deb
sudo dpkg -i cuda-keyring_1.1-1_all.deb
sudo apt update
Confirming you have your cuda-toolkit is simply a matter of nvcc --version
c@192.168.1.4:~$ nvcc --version
nvcc: NVIDIA (R) Cuda compiler driver
Copyright (c) 2005-2026 NVIDIA Corporation
Built on Mon_Oct_12_19:25:48_PDT_2026
Cuda compilation tools, release 13.5, V13.5.37
Build cuda_13.5.r13.5/compiler.39125733_0
Part B. Benchmarking your GPU / RAM / GPU to RAM / RAM to GPU.
Some of the basics we had covered previously and we link to this for reference:
thinkmeltprotonmail.com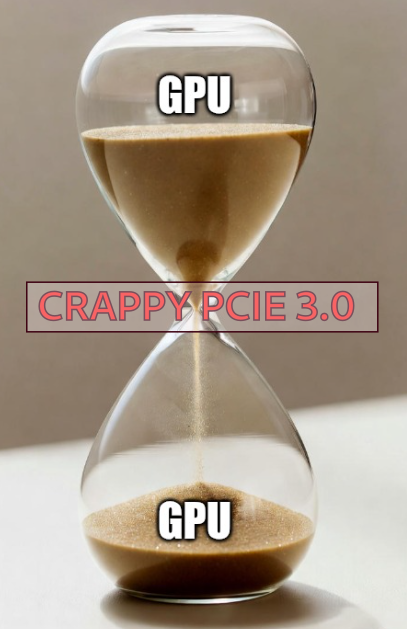
sudo apt install mbw
mbw 10G
One can quickly see that in various memory copy configuration our Ryzen 9 3900X is only going at ~8.5GB/s - that is slow, but for MOE (Mixture-of-Experts) LLM's this is invaluable information.
Long uses 8 bytes. Allocating 2*1310720 elements = 20971520 bytes of memory.
Using 262144 bytes as blocks for memcpy block copy test.
Getting down to business... Doing 10 runs per test.
0       Method: MEMCPY  Elapsed: 0.00114        MiB: 10.00000   Copy: 8779.631 MiB/s
1       Method: MEMCPY  Elapsed: 0.00114        MiB: 10.00000   Copy: 8733.624 MiB/s
2       Method: MEMCPY  Elapsed: 0.00116        MiB: 10.00000   Copy: 8598.452 MiB/s
3       Method: MEMCPY  Elapsed: 0.00119        MiB: 10.00000   Copy: 8431.703 MiB/s
... so on ..
nvbandwidth - Swiss Army Knife of GPU Speed Testing.
After this we take a quick review of the nvbandwidth tool again:
sudo apt update -y
sudo apt install git build-essential libboost-program-options-dev cmake -y
sudo apt install nvidia-cuda-toolkit  # This should be done from above!
We can then pull the git and compile it after setting the path for nvcc with export PATH=/usr/local/cuda-13.5/bin:$PATH
git clone https://github.com/NVIDIA/nvbandwidth.git ;
cd nvbandwidth ; cmake
Or an explicit cmake tuned for your compute capability can be done with:
nvidia-smi --query-gpu=compute_cap --format=csv,noheader
8.6
cmake .. -DCMAKE_CUDA_ARCHITECTURES=86 -DCMAKE_CUDA_COMPILER=/usr/local/cuda/bin/nvcc
Once it compiles cleanly - you can copy nvbandwidth to /usr/bin/ to make it globally visible. sudo cp nvbandwidth /usr/bin/
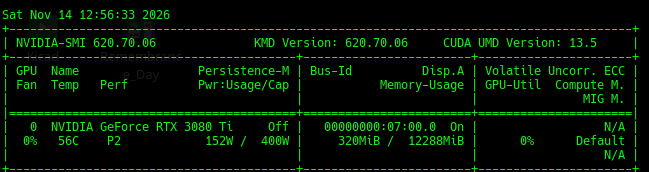
If you just run nvbandwidth without options you will see the power spike on the nvidia-smi as in:
Where it gets interesting and why GPU's are so valuable in the first place is memory-to-memory bandwidth is astronomically faster than between the PCIe bus or even memory controller, for instance:
SUM host_to_all_memcpy_sm 19.76
COEFFICIENT_OF_VARIATION host_to_all_memcpy_sm 0.001954

Running host_to_all_bidirectional_memcpy_sm.
memcpy SM CPU(row) <-> GPU(column) bandwidth (GB/s)
           0
 0     10.21

SUM host_to_all_bidirectional_memcpy_sm 10.21
COEFFICIENT_OF_VARIATION host_to_all_bidirectional_memcpy_sm 0.004965

Waived all_to_one_write_sm: no accessible peer GPU pairs (P2P not supported between any devices)
Waived all_to_one_read_sm: no accessible peer GPU pairs (P2P not supported between any devices)
Waived one_to_all_write_sm: no accessible peer GPU pairs (P2P not supported between any devices)
Waived one_to_all_read_sm: no accessible peer GPU pairs (P2P not supported between any devices)
Running host_device_latency_sm.
memory latency SM CPU(row) <-> GPU(column) (ns)
           0
 0    630.68
630.68 GB/s - Whoa..
A list of nvbandwidth options
nvbandwidth --help
nvbandwidth Version: v0.11.0
Built from Git version: v0.11.0

Usage: nvbandwidth [--help] [--version] [--version] [--bufferSize SIZE] [--list] [[--testcase TEST...]...|[--testcasePrefixes PREFIX]...] [--verbose] [--skipVerification] [--disableAffinity] [--testSamples N] [--targetNumPairs N] [--useMean] [--useHugePages] [--format FORMAT] [--force-le-variant] [--force-raw-pointer] [--force-nvml-fabric-info-fallback] [--pair UUID...]

A tool for bandwidth measurements on NVIDIA GPUs.

Optional arguments:
  -h, --help                         shows help message and exits
  -v, --version                      prints version information and exits
  --version                          Print nvbandwidth release version and exit
  -b, --bufferSize                   Memcpy buffer size in MiB [nargs=0..1] [default: 512]
  -l, --list                         List available testcases
  -t, --testcase                     Testcase(s) to run (by name or index) [nargs: 0 or more] [default: {}] [may be repeated]
  -p, --testcasePrefixes PREFIX      Testcase(s) to run (by prefix) [may be repeated]
  -v, --verbose                      Verbose output
  -s, --skipVerification             Skips data verification after copy
  -d, --disableAffinity              Disable automatic CPU affinity control
  -i, --testSamples                  Iterations of the benchmark [nargs=0..1] [default: 3]
  -P, --targetNumPairs               Target pairs for multinode device-to-device tests [nargs=0..1] [default: -1]
  -m, --useMean                      Use mean instead of median for results
  -H, --useHugePages                 Use huge pages for host allocations
  -F, --format                       Output format [nargs=0..1] [default: "text"]
  --force-le-variant                 Force Logical Endpoint (Handle) variant for TMA tests (auto-selected on future architectures). Peer buffer is the LE; local/executing buffer is a raw device pointer (Write: ptr->LE, Read: LE->ptr; LE-LE unsupported). CE always uses raw pointers.
  --force-raw-pointer                Force raw pointer variant for TMA tests (auto-selected on Blackwell and older)
  --force-nvml-fabric-info-fallback  Force NVML fabric-info fallback for multinode fabric pre-flight validation
  --pair                             Run tests only between these two GPUs (by UUID). GPUs may be on the same or different nodes. [nargs: 2]

Examples:
  nvbandwidth                          # Run all testcases
  nvbandwidth -l                       # List available testcases
  nvbandwidth -t host_to_device_memcpy_ce device_to_host_memcpy_ce
  nvbandwidth -p device_to_device      # Run all device_to_device* tests
  nvbandwidth --format json            # Output in JSON format
gpu-burn One Step Before Tensor Pinning!
Once we have gotten this far is to look at serious compute-testing before we move onto the final of unlocking the full tensor-cores for our GPU, so:
git clone https://github.com/wilicc/gpu-burn && cd gpu-burn && make
~/nvbandwidth/gpu-burn$ gpu_burn -tc 1024 15
Using compare file: compare.fatbin
Burning for 1024 seconds.
GPU 0: NVIDIA GeForce RTX 3080 Ti (UUID: GPU-7478ba03-1b3e-5c77-f22e-8eab53fbb2d3)
Initialized device 0 with 11929 MB of memory (11628 MB available, using 10465 MB of it), using FLOATS, using Tensor Cores
Results are 268435456 bytes each, thus performing 38 iterations
2.3%  proc'd: 1406 (64448 Gflop/s)   errors: 0   temps: 77 C ^C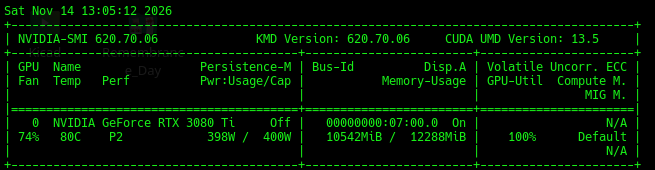
Heat Kills Cards - We use the 70°C Rule
After a few minutes the card will read near maximum temperatures, but often what is not looked at if you were to look at the GPU with a thermal camera heat islands reside that will build up. Toms Hardware proves it in this article on Nvidia GPU's: You can clearly see one point heat is way higher than the rest of the card.
 Hassam Nasir
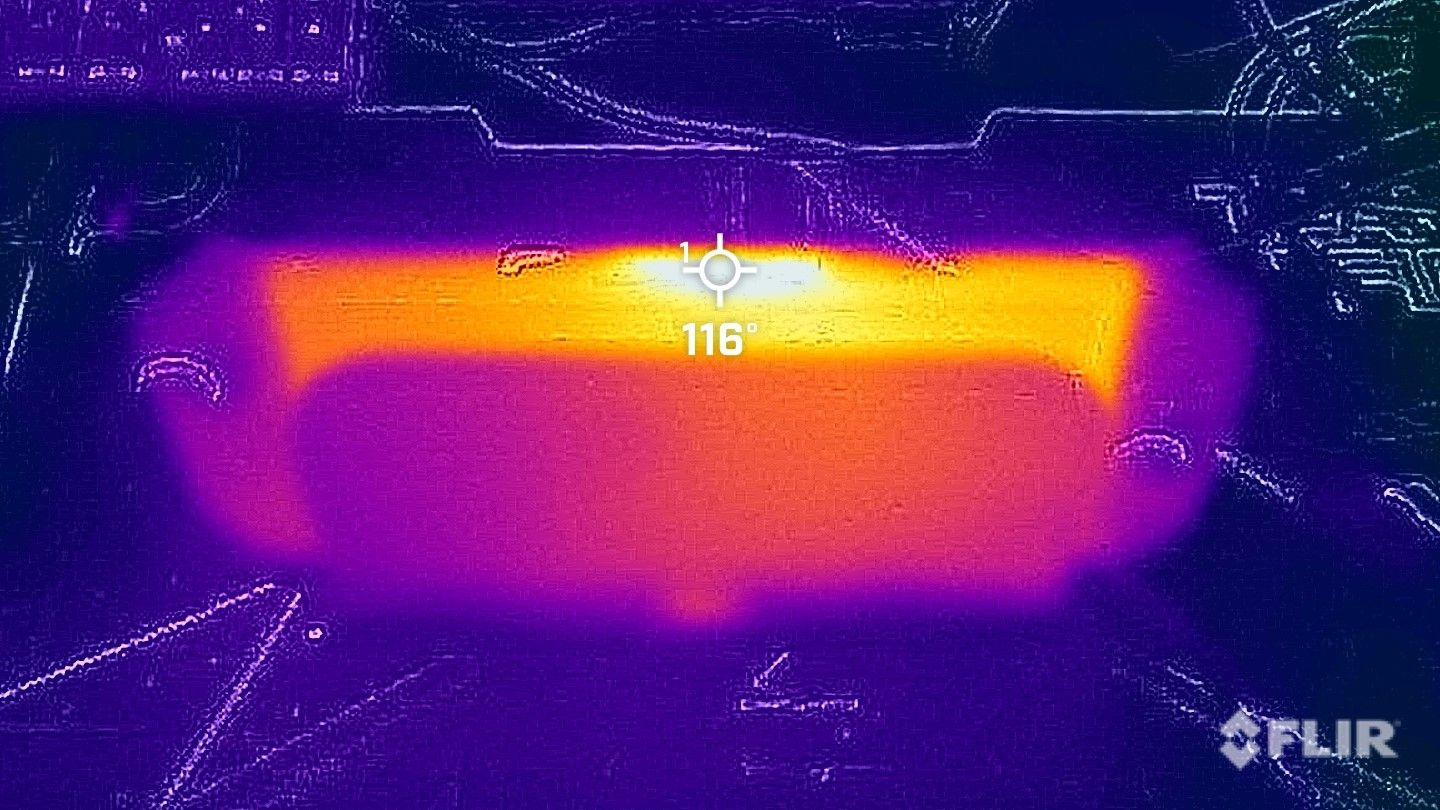
Because of this - it is highly recommended a good-flow fan blows on the whole motherboard, along with the 70°C rule - we always power limit our devices so we never read a temperature above 70°C. We honestly feel by doing this one can expect years of safe use.
nvidia-smi --query-gpu=name,power.min_limit,power.default_limit,power.max_limit --format=csv
name, power.min_limit [W], power.default_limit [W], power.max_limit [W]
NVIDIA GeForce RTX 3080 Ti, 100.00 W, 400.00 W, 450.00 W
sudo nvidia-smi -pl 200
sudo nvidia-smi -pl 200 will limit the power to 200 watts - which when tested kept the card at a cool 58C -nice! So upping it to 300..
sudo nvidia-smi -pl 300 etc.. etc..
And then we set persistence mode so it survives reboots:
sudo systemctl enable --now nvidia-persistenced.service
# Alternately
sudo systemctl enable --now nvidia-powerd.service
systemctl status nvidia-persistenced
Standard Mode - GFLOP Testing
We tested out a number of power levels and were astonished about power savings, check this out, for all tests we simply ran a gpu_burn -tc 1024 15
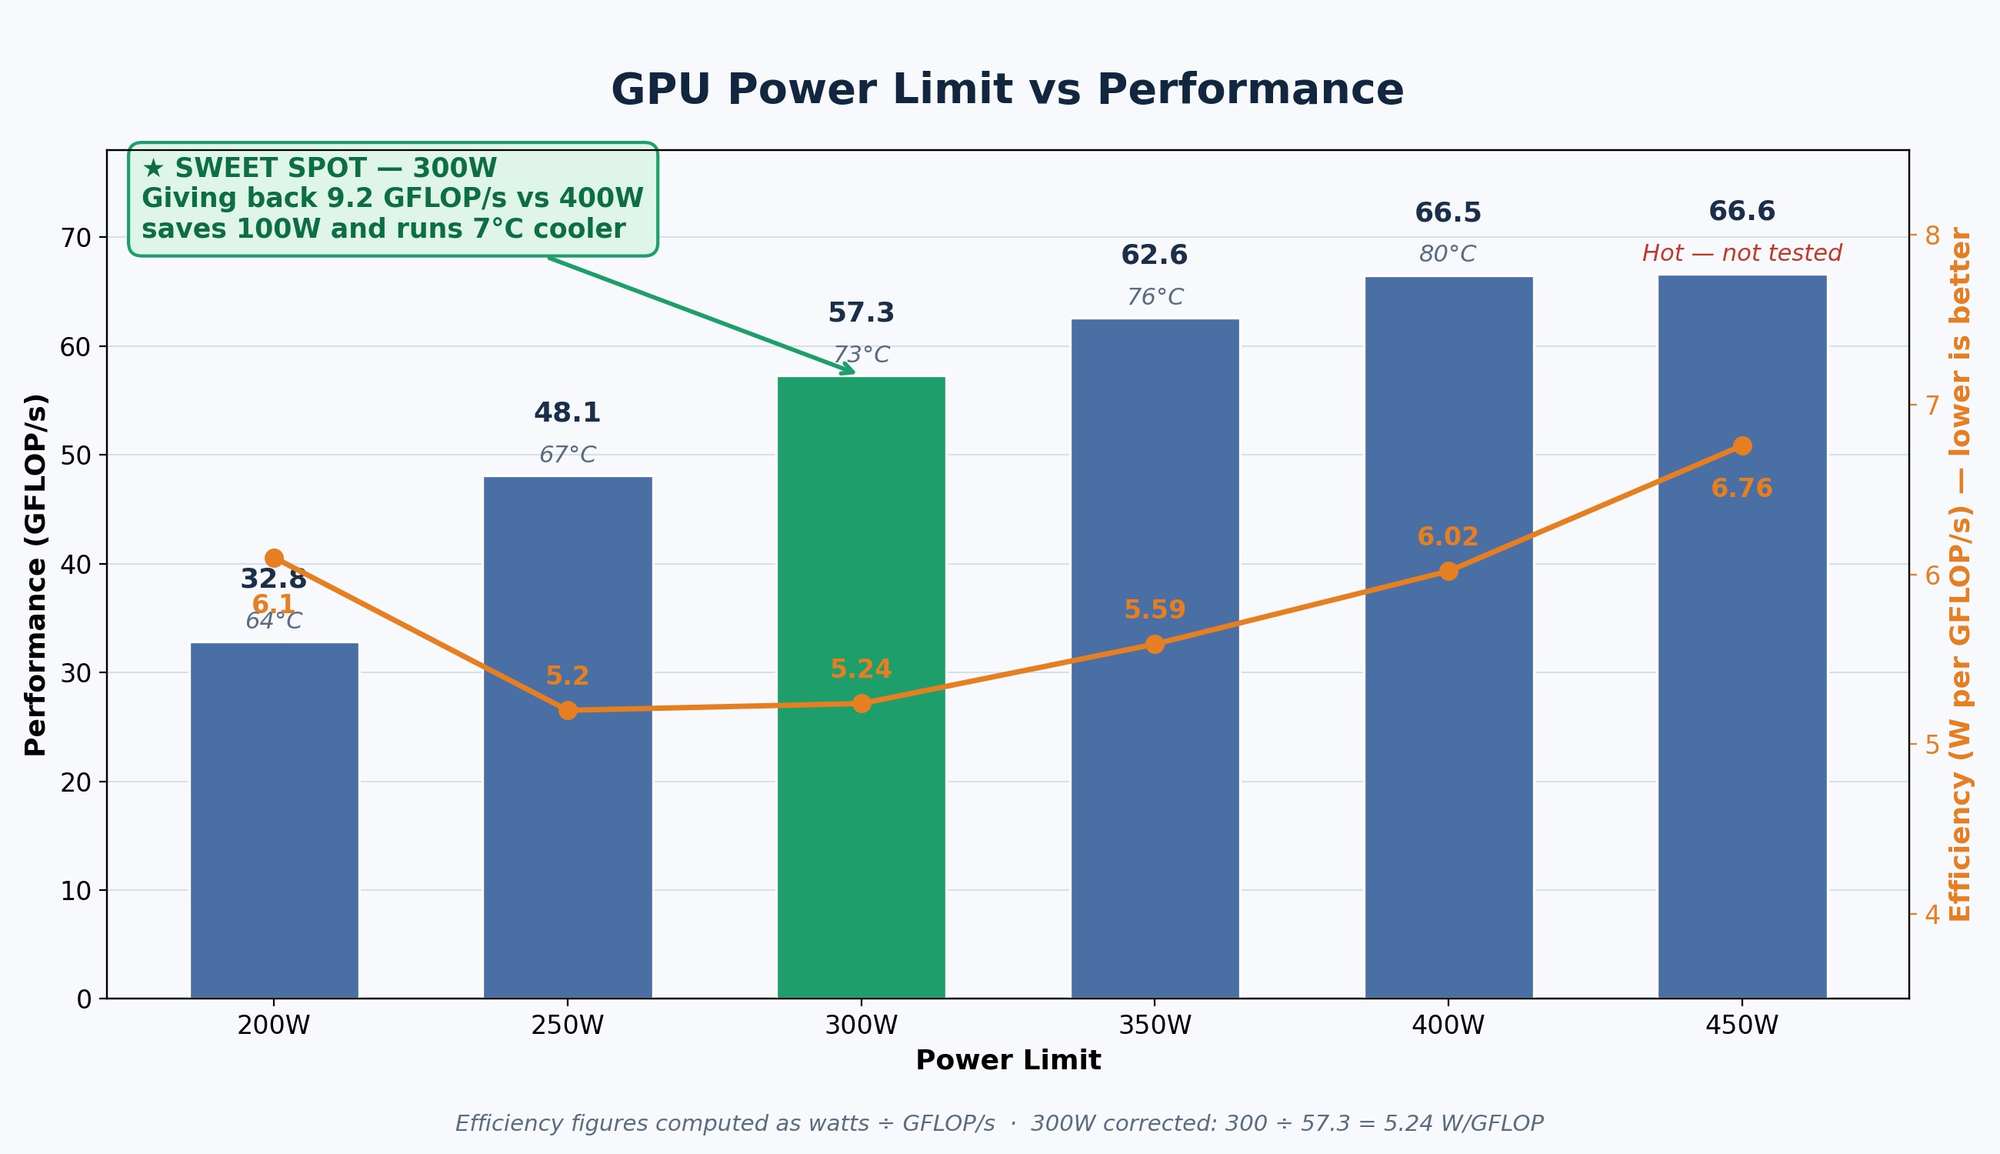
Quickly we can see a 30% savings reduction in power by simply power-limiting the card.
Tensor Pinning
Now that we have thoroughly looked at the meaty details of drivers, benchmarks and various standard performance metrics of our 3080ti example card we are going to test it again with the tensor cores unlocked. It must be understood that this will effect the FP16, BF16, TF32, and FP8 speeds, however INT8 and INT4 type computations will not see major speedups. We are working through the guide from:

We install with:
git clone https://github.com/Zagitta/gpu-unlock
cd gpu-unlock
make install
We then updated our /etc/default/grub to fix the GRUB_CMDLINE_LINUX_DEFAULT options.
GRUB_CMDLINE_LINUX_DEFAULT='quiet splash gpu_unlock.targets=all'
Followed by a sudo update-grub and a simple sudo reboot we were up!
Tensor Pinning Performance is Significant
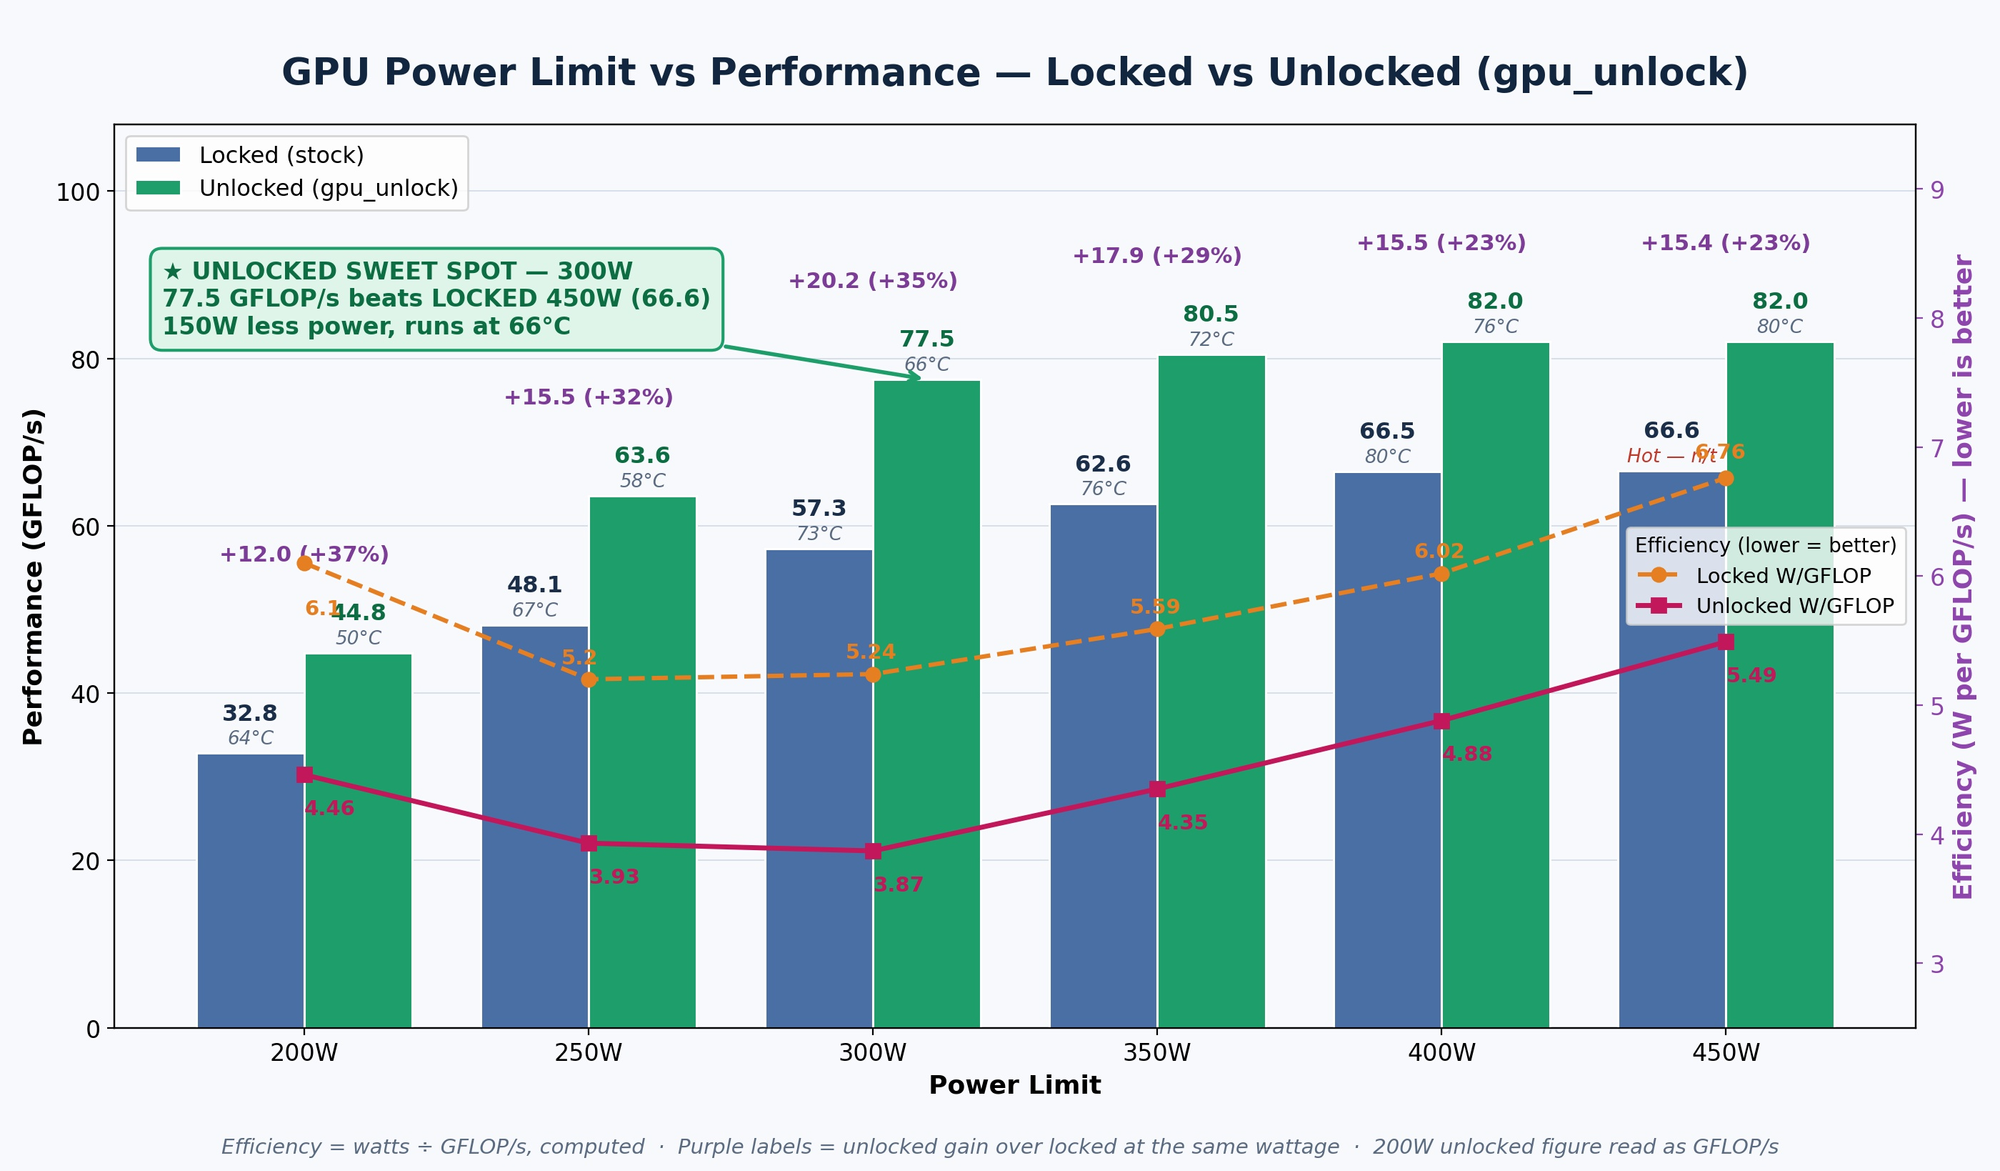
muse.ai made some interesting comments about it all,
What jumps out of your unlocked data:
- Biggest win is at 300W: +20.2 GFLOP/s (+35%) — and it's now the efficiency king too at 3.87 W/GFLOP, beating even unlocked 250W (3.93). 77.5 is 94.5% of your peak 82, for 150W less than 450W.
- Unlocked runs cooler at every single wattage — 14°C cooler at 200W, 7°C at 300W, 4°C at 400W. More work done per clock cycle means less time cooking.
- The unlocked curve flatlines even harder past 350W: 80.5 → 82.0 → 82.0. That last 100W buys you 1.5 GFLOP/s and 8°C.
- Fun comparison: unlocked at 250W (63.6) beats locked at 350W (62.6), and unlocked at 300W beats locked at 450W outright.
Conclusion - +20.2 Gflops and 3.87W/Gflop. +35%. Yes Please.
An extra +20.2 Gflops is nothing to sneeze at - if you were to simply buy a video card with that much compute it would roughly be the equivalent of buying an RTX 3070 / 3070ti card! Getting the unlock to work was more reliable than just trying to install the mangly drivers in the first place. In short it worked. No it is not going to make a large difference for many MOE (Mixture-of-Experts) type LLMs - as they do not stray into BF16 type compute instances, but it raises a lot of eyebrows when you can limit your power 100 watts in standard mode to see a 8 Gflop change in performance. Whoa!