ssh workups - plumbing and piping - tunneling, reverse tunneling, socks5, ssh jumps and funsies.
ssh workups - plumbing and piping - tunneling, reverse tunneling, socks5, ssh jumps and funsies.


ssh is the defacto 'go-to' for secure plumbing and piping. Let's start with the basics and work our way up. We do this deliberately to prevent skill-fade.
REMEMBER THIS - NONE OF THIS WORKS IF YOUR ORIGINATING SERVER IS BLOCKING THE PROXY PORT SO OPEN IT FIRST!
ufw allow <outgoing port>SSH with graphics:
- By adding either the -X or -Y option one can easily pipe graphics from most X11 enabled Linux machines.
ssh -X c@192.168.1.3And then typing 'xclock' is the easiest and quickest way to verify you can pipe graphics:

SSH Via Socks5 Proxy
A very easy method of building your own VPN service like NordVPN can be done between two linux boxes with a simple command:
ssh -D 12000 c@someserver.comOnce this is done one can simply point their browser to access the internet via port 12000 at localhost:
Additionally you can specify the originating port of the server itself which will just make it open a port for other devices on your home net to use as a proxy, as in:
ssh -D 12000 c@localIPA nice feature is that one can install firefox add-in 'Containers' and 'Container-Proxy.' Once this is done one tab of your browser can be direct, another can be through your proxy:

Additionally one can add the -N option for 'no-login'
ssh -D 12000 -N c@somelinuxserver.comSSHFS - One can mount remote filesystems through SSH tunnels. In this guide I was able to mount the 'hard drive' of a SD card on a VPS 1000 miles away and have it come back:

Advanced ssh Punching Funsies: ssh through a SOCKS5 Proxy.

There is almost no documentation on the internet how to do this properly and it is a neat feat to see if you can even do this. Above the standard SOCKS proxy works fine for rerouting http web traffic - But what if we punch a ssh session through a SOCKS proxy itself. Here is how to do it!
Install netcat-openbsd (the regular nc cannot do this)
sudo apt install netcat-openbsdNext get your standard SOCKS proxy working as in:
ssh -D 12000 user@someserverOnce you have that working it should be identifiable from a localized nmap scan:
nmap localhostWill show that your local port is open:
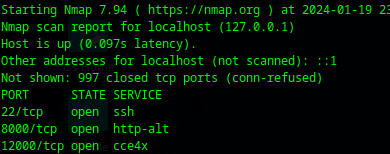
Now punch your ssh through the SOCKS5:
ssh -o ProxyCommand='nc.openbsd -X 5 -x 127.0.0.1:12001 %h %p' c@destinationSome explaining:
-X 5  (ssh cannot use SOCKS5 proxy but nc.openbsd can)  If you had a SOCKS 4 it would be -X 4
-x 127.0.0.1:12001  (Proxy that nc.openbsd will punch through)
%h %p are expected following parameters
c@destinationserver  (Where you are going)
Old Style Proxy Jumping:
One can also utilize 'old style' proxy jumping as in:
# In this example we are copying a key to a distant Class C isolated machine as in:
ssh-copy-id -o ProxyCommand='ssh -W %h:%p user@jumphost' user@192.168.0.3
Advanced ssh Punching Funsies: ssh proxy with Jump.
Experimenting with this did not seem to work more than two servers. The -J option is a alias for the 'ProxyJump' command but will effectively route through one ssh tunnel through a second and come out at point 3.
ssh -D 9999 -J c@138.128.223.76 c@166.212.158.61

# Advanced porting with external IP binding has a small modifications as in:
ssh -D 0.0.0.0:9999 -J c@ip_a c@ip_b etc..
In this example (which somehow actually works!) We are opening up a SOCKS5 proxy to the localhost and it tunnels through the midpoint server (138.128.223.76) and finally hits the internet at the end (166.212.158.61)
Limitations.
ssh -D 9999 -J c@pointA c@pointB c@pointCDoes not work. I've tried several times so one will quickly find limitations. But knowing that you can use the above ProxyCommand you can technically tunnel SSH through the SOCKS5 jump proxy to get to point 4. But probably by that time there are so many layers it probably would not work well.
-L Mastering: Port Forwarding Grainularity

The basic port forwarding can be accomplished as in:
ssh -L servera:9000:serverb:22 account@serverbThis command is very poorly explained and very poorly documented.
Let's take the following command - which is used as a explaining guide all over www.stackoverflow.com but its a brutally poor example. Lets go over what really happens here
ssh -L 9000:192.168.1.3:22 c@10.1.1.1- We would think that it would externally open up port 9000 forwarding it to port 22 at 10.1.1.1..
- Well actually no - not quite - what actually happens is it only binds to port 9000 only [IF] you are localhost!!! The external port never opens!
- What is even more confusing is that - no tunnel is ever made to 10.1.1.1!! It is actually only piping 9000 to port 22 of 192.168.1.3!!
- The admin is even more confused at this point because the ssh is still opened to 10.1.1.1 - so why doesn't it work!!?
- You have effectively executed two ssh commands at once! One for a port forward from 9000 only if you are local host back to 22 on 192.168.1.3 and you have then secure shelled into 10.1.1.1 - no wonder this command is so badly understood!
- To actually port forward you have to do it like this:
ssh -L 192.168.1.3:9000:10.1.1.1:22 c@10.1.1.1- >>THIS<< actually will give you a listening port at 192.168.13 for port 9000 and when you connect to it with:
ssh -p 9000 c@192.168.1.3- You will reach 10.1.1.1 on port 22.
- What if you want to bind to all external ports?? - It would become like this:
ssh -L *:9000:10.1.1.1.22 c@10.1.1.1This command would then listen on 192.168.1.3, 127.0.0.1, localhost and whatever else it can bind to. When you ssh -p 9000 you will end up at 10.1.1.1
This is one of the most poorly documented misunderstood ssh commands out there, and the guides for them explain it utterly poorly.
-R Reverse Port Tunnelling
Simply turn the command backwards as in:
ssh -R 9000:localhost:5555 user@outsideserver.comIn this case we are mapping remote port 9000 at outsideserver.com to localport 5555. Anyone logged into outsideserver can do:
ssh localhost -p 9000 And will show up at the remote host.
Reverse Remoting Through Your Home Network:

A reverse tunnel with the -R option is a great way to allow you to access your home networks very securely. Consider:
ssh -o ServerAliveInterval=30 -R 9000:localhost:22 user@203.282.182.113- Routers will kill connections that do not have traffic on them in variant time amounts. The option
-o ServerAliveInterval=30Will make sure to keep the connection alive.
-R 9000:localhost:22 c@203.282.182.113Will allow one to ssh back through the local ISP infrastructure (which actually has a lot of hidden port overloading) through your local router, and back to your home computer from the outside server at 203.282.182.113.
Summary:
ssh is powerful but has a lot of gotchas. Many of the guides do not deeply explore what actually works in testing just as the -J option which actually does not work past the 3rd point, or what really is happening with the -L option.
