RPi2040 C Code Interrupt Example


- An Interrupt is just that - an interrupt of a running program to handle an event (mouse click, keyboard, video, hard drive - etc.)
- Interrupts actually have a long history. You can read about the history of the interrupt for the PC DOS from many years ago.
 Contributors to Wikimedia projects
I noticed that there was literally next to no working (or scarce, and I need to google for this all day) examples of Interrupt Handlers for the RPi2040 in terms of the C language.
- So. write this guide and put it all together for reference purposes.
If you are looking for a basic primer of how to write a interrupt handler in Python:
- Raspberry Pi GPIO Interrupt in Python
- Another very good tutorial from electrocredible.com
Because micropython execution speeds are estimated to be about 100 - 250x slower than embedded C. Micropython is great for some tinker projects like triggering on a button - but we want to get to the raw speed of the microcontroller - so we need to work in C, but that also makes development considerably more complex until you get used to it.
Writing an Interrupt Handler in C:
- Before you can compile C code for the RPi2040 there are some background work on setting up your Cmake / Development environment. The guide below will get you up and going!
 thinkmeltprotonmail.com
Luckily for us the authors of the Raspberry pi made the most simplest example from the github page:
 raspberrypi
Going over the code of the main block:
#include <stdio.h>
#include "pico/stdlib.h"
#include "hardware/gpio.h"

void gpio_callback(uint gpio, uint32_t events) {
    // Put the GPIO event(s) that just happened into event_str
    // so we can print it
    gpio_event_string(event_str, events);
    printf("GPIO %d %s\n", gpio, event_str);
}

int main() {
    stdio_init_all();

    printf("Hello GPIO IRQ\n");
    gpio_set_irq_enabled_with_callback(2, GPIO_IRQ_EDGE_RISE | GPIO_IRQ_EDGE_FALL, true, &gpio_callback);

    // Wait forever
    while (1);
}- gpio_set_irq_enabled_with_callback passes it's parameters to the &gpio_callback assigned function defined above it (ok that's confusing..)
- Explaining this again gpio_set_irq_enabled_with_callback is a function assigning the handler function when the target GPIO pin has a trigger where it goes from high-to-low or GPIO_IRQ_EDGE_FALL.
Searching the internet for the potential values that can be passed are:
GPIO_IRQ_LEVEL_LOW = 0x1u,
GPIO_IRQ_LEVEL_HIGH = 0x2u,
GPIO_IRQ_EDGE_FALL = 0x4u,
GPIO_IRQ_EDGE_RISE = 0x8u,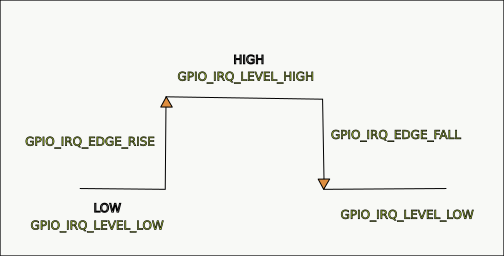
- So naturally if you have a constantly low pin and you set GPIO_IRQ_LEVEL_LOW - it is going to trip and call the interrupt handler function constantly.. Fair enough!
- The gpio_set_irq_enabled_with_callback is defined as:
void gpio_set_irq_enabled_with_callback (uint gpio, uint32_t event_mask, bool enabled, gpio_irq_callback_t callback)
Breaking this down:
- gpio - specify which pin will activate this IRQ.
- event_mask - one or more of GPIO_IRQ_LEVEL_LOW etc etc, separated by a C OR function ( | );
- bool enabled (pass true or false)
- gpio_irq_callback_t callback - specify the function to handle the callback.
Another example:
gpio_set_irq_enabled_with_callback(3, GPIO_IRQ_EDGE_RISE | GPIO_IRQ_EDGE_FALL, true, my_handler_function);From page 60 of the documentation however we see the one catch/gotcha - you are allowed 1 interrupt per GPIO bank?
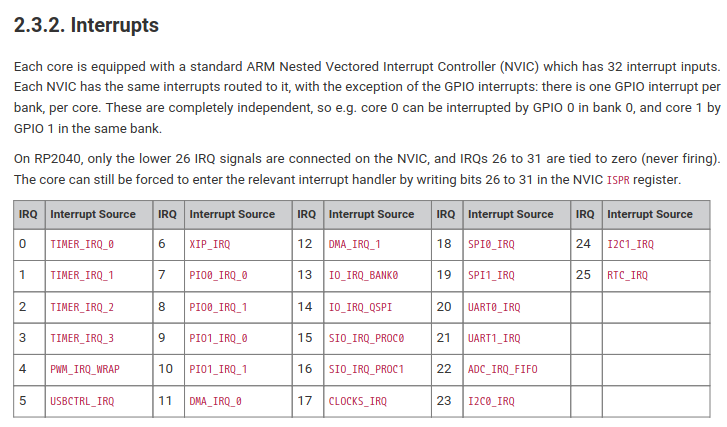
Expanding from This:
It needs to be understood that there is only [one] IRQ handler for the entire bank, as discussed in this thread:
https://forums.raspberrypi.com/viewtopic.php?t=339696
Solves this issue with the following code example:
- Set one IRQ for one pin of one of the four monitor states that you want to monitor.
- Add for each pin that you want to monitor with:
gpio_set_irq_enabled(1, GPIO_IRQ_EDGE_RISE | GPIO_IRQ_EDGE_FALL, true);
gpio_add_raw_irq_handler(1,irqhandler1);
gpio_add_raw_irq_handler(2,irqhandler2);- With the associate handlers:
void irqhandler1() {
    if (gpio_get_irq_event_mask(1) & GPIO_IRQ_EDGE_RISE | GPIO_IRQ_EDGE_FALL) {
        gpio_acknowledge_irq(1, GPIO_IRQ_EDGE_RISE | GPIO_IRQ_EDGE_FALL);
        gpio_xor_mask(0b100);
    }
}

void irqhandler2() {
    if (gpio_get_irq_event_mask(4) & GPIO_IRQ_EDGE_RISE | GPIO_IRQ_EDGE_FALL) {
        gpio_acknowledge_irq(4, GPIO_IRQ_EDGE_RISE | GPIO_IRQ_EDGE_FALL);
        gpio_xor_mask(0b100000);
    }
}
In this instance if there is a GPIO_IRQ_EDGE_RISE or GPIO_IRQ_EDGE_FALL on either pin 1, or 4 it will call the respective irqhandler1(), and irqhandler2().
Compilation Errors:
- You may reach a point where your project stops making the elf2uf2 file!
- Inside your pico-sdk/elf2uf2 folder is a small converter/ compiler application:

- You can copy this as a standalone to your working directory to convert your elf to uf2 binaries that the RPi2040 can work with!
