VM: sshfs: Remote Disk over SSH setup (Part 1)
In this guide we go through the setup of mapping a drive over sshfs and getting it to automount.

Big thanks to buyapi.ca who sell these at link - for $18.95 Cdn.
The goal is to mount the SD 'hard drive' of the raspberry pi zero gumstick to the VPS (1000 miles away) over a reverse proxy ssh tunnel - through your home router.. Then we want to make it persistent and auto-loading. SD cards can be insanely fast and easily outperform the old physical platters that are disappearing as solid state prices continue to drop. A raspberry pi zero can run in under a watt. VPS's are really inexpensive and can be powerful for the dollar, but the one limiter is the hard drive space allocated for them can be small! Because there are a lot of moving parts to pull this off - we broke it down into small steps. Do each in order - so it's fully understood, and simple in understanding as possible. Let's get started!

Raspberry Pi Zero Side (a) (4 steps - Part a)
a-0. Enable ssh to your raspberry pi and get openssh working.
a-1. Make a reverse proxy from the raspberry pi zero gumstick(a) to the VPS(b).
a-2. Test the reverse proxy so that we know we can get from the VPS to the raspberry pi zero through the reverse tunnel across our home router's NAT. We also test a pivot maneuver where we start at the VPS and use the reverse-proxy tunnel of the pi - to hit a third party device behind the NAT. Cool!
a-3. Make the reverse proxy automatically establish itself on reboot and make it persistently open with a traffic utility (production level)

VPS (Virtual Private Server) (part b - 3 steps) $3 / month at: servercheap.net
b-1. Build a sshfs auto-mount back through the raspberry pi zero's reverse proxy.
b-2. Make it auto mounting on reboot and detection (persistence).
b-3. Test the mount if it is a gimmick or production useful.

Let's get started!
a-0. Get ssh working on your raspberry pi and enable the ssh server. There is a little helper-manager in the raspberry pi so we will use it. From inside your raspberry pi open a terminal (on the desktop) and type:
sudo raspi-config

And then enable it. You can test a ssh-link back to yourself now and it should work. Open a terminal inside the raspberry pi and type:
ip addr
Our raspberry pi has taken 192.168.2.45 from the dhcp service in the home router. Let's test that it accepts ssh back to itself.
ssh user@192.168.2.45
By this time you should be able to go anywhere inside your home ip space and ssh into it (putty from windows laptops or whatever).
a-1. Reverse Proxy. Next we want to make a reverse proxy from the raspberry pi zero to the VPS. A lot of examples work in certain conditions but we will focus on known working configurations for the pi. Do recall we are punching through two firewalls plus your routers NAT - and building a reverse accepting tunnel.
- minimalist command with diagnostics (-v verbose level 1) -vv, and -vvv is also available. From inside the ssh of your raspberry pi:
ssh -v -R 5000:localhost:22 user@vps_server_ipIn verbose mode we get a lot of logs:

a-2. Test it backwards (from inside your VPS type the following).
ssh c@localhost -p 5000
Gotcha: -R 5000:localhost:5000 does not work as the raspberry pi is not accepting ssh connections incoming to 5000. But several internet examples will confusingly suggest this.

Review and Understand What is Happening Here: -R 5000:localhost:22 effectively means ON the VPS it will listen at port 5000 and any connections to it will route back to the raspberry pi 1000 miles away on port 22, even though this command came from the raspberry pi. Which is interesting because this command opened a port without root access to the VPS. At the VPS end when we type ssh user@localhost -p 5000 we are effectively saying inside the view of port 5000 look for a listener for localhost (back at the raspberry pi) and ssh to it..
a-2. Pivot Test (Single Device)
Next we want to now expand this to allow the raspberry pi to act as a pivot to other devices in the subnet. This in itself is very useful as we can access a server or device remotely. We found that this worked with a straight config and you did not need to enable 'tcpforwarding' in your /etc/ssh/sshd_config etc.
ssh -fN -R8000:192.168.2.201:22 user@vps_server_ip.comFrom inside the VPS:
ssh user@locahost -p 8000
It worked! Let's review. When we executed this on the remote VPS it pushed completely through the raspberry pi and went straight to our laptop. In essence we established a ssh-reverse-proxy-router.. Reviewing the following 8000:192.168.2.201:22 states:
- Listen on port 8000 (at the VPS) and forward it to 192.168.2.201:22 and establish this on the VPS at user@vps_server_ip.com - even though this command came from a third-party IP of 192.168.2.45 (in this instance from the raspberry pi).
What will not work thus far from the VPS.
ssh c@192.168.2.201 -p 8000 This simply did not work, the only reverse accepted connection thus far was c@localhost from the VPS side and subject of study.
a-3. Production level setup: (KeepAlive / Send to background - no password/ reboot persistence)
- Keepalive. We want the raspberry pi to 'keep alive' the connection as most NAT home routers will simply kill a temporary connection after a usual 30..180 seconds - so it needs to update pretty frequently. We are going to add a ssh setting.
sudo nano /etc/ssh/sshd_configAdd the following:
ClientAliveInterval 15Then restart your sshd service:
sudo systemctl restart sshdTesting for keep-alives:
- Does it work? Here is how to check:
ssh -vvv user@somewhereWait your obligatory ServerAliveInterval and you will see the keep-alive packets coming in:

2. Send-to-Background / Password-less
Lets make the ssh session from raspberry pi to VPS password-less. From inside your raspberry pi do (just hit enter for filename etc until done)
ssh-keygen
This built a private/public rsa key pair. Now we will establish automatic credentials to the VPS.
ssh-copy-id user@host
Now log-ins are automatic.
Now that no password is required to ssh to something we can call a nohup reverse proxy setup as in:
nohup ssh -fN -R 8000:localhost:22 c@vps_server.com &Is it there persistent in memory? We can look for it with:
ps -aux | grep 8000
Review what happened here:
- nohup (no hangup make this persistent even if we log off.)
- ssh -fN -R 8000:localhost:22 c@vps_server.com (No terminal - establish our reverse proxy)
- & Send this command to the background as soon as it runs.
We are pretty close now, however if reboot the gumstick this will get lost, so we can set this up to once a minute check for the connection and reestablish it - if it fails. There are two ways that this can be done:
- Setup a crontab that runs once a minute calling a bash script, or
- Setup a systemctl service that runs once a minute (outside cron)
Amazingly the tiny gumstick supports both! For simplicity sake we will just setup a crontab. We can see how much complexity is building into this project so we want to always make small steps and test each one as we go. Therefore we will just build a crontab that runs once a minute and broadcasts a 'hello world' message. We will reboot the gumstick and watch from inside a console. First just make sure that cron is enabled and working and if your gumstick is stock it should already be running:
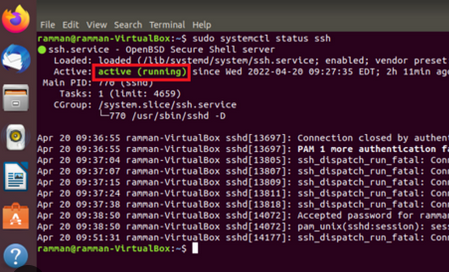
systemctl status cron
# If it fails:
systemctl enable cron
systemctl start cron
Knowing it's up and running we can edit the cronjob(s) for root.
sudo crontab -e -u rootHow nice of raspberry pi to present us with an option to select our favourite editor. Since vi/vim is a little awkward we can use nano:

We then add the following to the bottom:
* * * * * /toolbox/go.shThe explanation of how this crontab job is setup is done really well at crontabguru:
We then make a directory off root '/toolbox' and add a script go.sh, it needs executable permissions and remember crontab is running a job for root.
sudo touch /toolbox/go.sh
sudo chmod +x /toolbox/go.sh
sudo nano /toolbox/go.sh
Inside go.sh
wall "Hello World"Save your go.sh with Ctrl-O / Ctrl-X.
If you did this all correctly you will have a broadcast message showing up even if you reboot the gumstick...

We are almost there! The last is to modify go.sh so that if it cannot see the existing tunnel is not running - it will recreate it. So we modify our go.sh for:
check='ssh -fN -R 8000:localhost:22 c@162.212.158.61'
ps_run=$(ps -aux | grep "$check" | grep -v grep)
if [ -z "$ps_run" ]; then
  printf "\n Not running, starting reverse proxy now..\n"
  $check
else
  printf "\n Reverse proxy is already running.. do nothing.. \n"
fi
Let's go over what this script is doing.
- check= 'ssh ... long command' this is our default ssh reverse proxy setup command,
- ps_run=$(ps -aux | grep "$check" | grep -v grep)
What is happening there is quite a bit:
- ps -aux : List ALL running processes.
- grep "$check" Is the long check='ssh...' in one of the processes?
- grep -v grep. Because the grep command itself creates a process we want to filter out the grep check itself and only allow the above ps -aux
- In essence ps_run will either be EMPTY if the process is not found - or hold a long string matching the $check string.
if [ -z "$ps_run" ]; then ...
- If ps_run is empty there is no running process start it up, or
- if ps_run is not empty then there IS a running process and do nothing.
Testing it:
- Restart the gumstick and monitor for the port at the VPS it should show up with a NMAP scan. NMAP is a utility for scanning for open ports.
sudo yum install nmap -y
# or
sudo apt install nmap -y
From inside your VPS:
sudo watch nmap localhostAs the gumstick is offline or rebooting you will not see it's reverse-proxy port:
- A single-core raspberry pi can take 2-3 minutes to just reboot. It's cpu-challenged...

Gotcha: At this point we realized that our script crontab was being called from root, but executing the ssh from the keystore inside the c 'user' account. From root adding a passwordless entry fixed it. As root:
ssh-keygen
ssh-copy-id c@162.212.158.61
As soon as we did this, the port automatically showed up online:


Some final notes:
- Port 8000 in our instance stayed open long after the gumstick was rebooting but it did reset when the gumstick rebooted.
- The gumstick is slow - it took a good 2-4 minutes to do a full reboot.
- root crontab was problematic it opened the process and left it open even though it did not automatically seem to succeed. A personal user crontab did fix this
crontab -u <user> -eNow onto Part 2: VPS side setup
