VM: docker: SSL ghost with nginx
In this guide we go through setting up a full SSL ghost blog with a NGINX front.


Configuration contortion extremis is this.
The goals.
- Move unencrypted learn.thinkmelt.com to www.thinkmelt.com with SSL.
- Setting up a docker w/ ghost/nginx/mysql containers all talking and working together.
- Overdocument it so it resolves a lot of poorly miswritten guides.
- I spent about a week trying to master / figure this all out towards something that works. I hope it helps others.
There are a lot of moving parts the docker engine, the class B plumbing between the containers, the nginx reverse-proxy, and when someone finally does get it to work properly they promptly never share or document how they pulled it off. However the same people that are adroit to share how they made it work will happily and hypocritically be begging for the working setup expecting everyone to give them answers. Anyways... Let's get started!
- Install docker / docker-ce etc.
Starting with a New Installation of Ubuntu 18.04 Plain:
sudo apt update -y && sudo apt upgrade -y
Right off the hop ubuntu 18.04 held broken packages and was not cleanly upgrading. Reboot and try to update and upgrade again:
sudo rebootUbuntu 18.04 as of 2023 / 05 had to update close to 216 packages.

- Opening Port 80 / 443
- Because docker handles adjustments to iptables automatically - we will not bring another layer of confusion to this by activating ufw (ultimate firewall).
- ufw is installed but off by default.
- Docker can open the ports automatically in the docker compose.

2. Installing docker / docker -ce from here
Which has been compressed into a single easy script: docker_install.sh
sudo apt-get update
sudo apt-get install ca-certificates curl gnupg
sudo install -m 0755 -d /etc/apt/keyrings
curl -fsSL https://download.docker.com/linux/ubuntu/gpg | sudo gpg --dearmor -o /etc/apt/keyrings/docker.gpg
sudo chmod a+r /etc/apt/keyrings/docker.gpg
echo \
  "deb [arch="$(dpkg --print-architecture)" signed-by=/etc/apt/keyrings/docker.gpg] https://download.docker.com/linux/ubuntu \
  "$(. /etc/os-release && echo "$VERSION_CODENAME")" stable" | \
  sudo tee /etc/apt/sources.list.d/docker.list > /dev/null
sudo apt-get update
sudo apt-get install docker-ce docker-ce-cli containerd.io docker-buildx-plugin docker-compose-plugin
chmod +x docker_install.sh && ./docker_install.sh3. Test that docker works
docker run hello-world

4. Install mariadb:10.1 docker-compose.yml
Make a directory in your /root named mariadb and inside it create a file name docker-compose.yml and put this inside of it.
- Spaces matter notice the 2-space indenting.
- 3306 is the public port that docker will map and expose to the internal port of the container (3306)
- We are mapping the directory local of /mysql to the one inside the container of /var/lib/mysql
version: '2'

services:
  mysql:
    image: mariadb:10.1.19
    restart: unless-stopped
    ports:
      - 3306:3306
    volumes:
      - ./mysql:/var/lib/mysql
    environment:
      MYSQL_ROOT_PASSWORD: 'password'
Once you have your docker-compose.yml typed up activate it with:
docker-compose upThis is temporary (non-daemon mode) as you are not using the -d (daemon mode). We do this initially to make sure it's all working.
docker-compose up -d5. Install nginx-proxy / Letsencrypt SSL Certificates.
nginx-proxy is the 'messy' part of the configuration - note:
- If the mysql setup is not perfect for this nginx docker it simply resorts to a SQLite local installation to itself (fine)!
- We are having it utilize a network named 'nginx-proxy'
- How is this working nginx is handling the SSL side while ghost is expecting and behaving still in a basic http environment.
docker network create nginx-proxyNow inside another directory 'nginx' make another docker-compose.yml and put this inside it (note 1 docker-compose.yml per directory)
version: '3'
services:
  app:
    image: 'jc21/nginx-proxy-manager:latest'
    container_name: proxy-manager
    restart: unless-stopped
    ports:
      - '80:80'
      - '81:81'
      - '443:443'
    volumes:
      - ./config.json:/app/config/production.json
      - ./data:/data
      - ./letsencrypt:/etc/letsencrypt
    networks:
      - nginx-proxy

volumes:
  data:
  letsencrypt:

networks:
  nginx-proxy:
    external:
      name: nginx-proxy-network
And then the config.json
{
  "database":
  {
    "engine": "mysql",
    "host": "localhost:3306",
    "name": "root",
    "user": "root",
    "password": "somestrongpassword",
    "port": 3306
  }
  "server":
  {
    "proxy_pass" : "http://107.152.41.231:8080",
    "proxy_set_header" : "X-Forwarded-For $proxy_add_x_forwarded_for",
    "proxy_set_header" : "X-Forwarded-Proto $scheme",
    "proxy_set_header" : "X-Real-IP $remote_addr",
    "proxy_set_header" : "Host $http_host",

  }
}
Once you have that you can stand up the nginx container with a simple
docker-compose up -dNow set it up (if you screw up your configuration delete the 'data' directory that is local inside the nginx folder.

Defaults for the nginx proxy is admin@example.com password changeme. As soon as you login you should be able to change it.
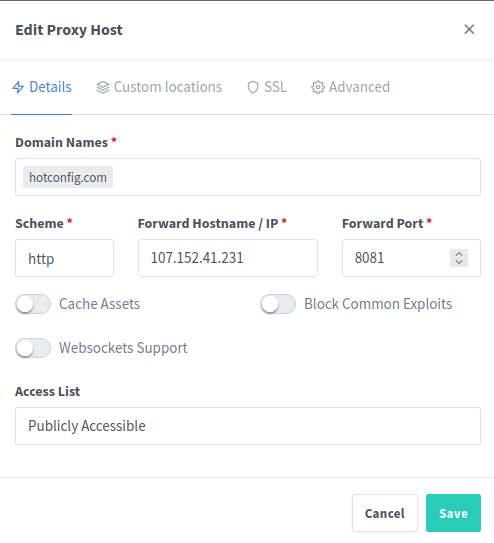
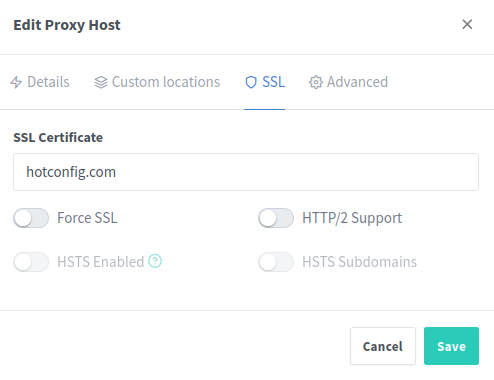
Now add a proxy and use this sites configuration for the example:
Do not forget you have it pull a fresh certificate for you from letsencrypt.com which may require setup.
6. Finally install a Container for Ghost Blog
Make a third directory 'ghost' and put a third docker-compose.yml inside it with the following:
version: '3.1'

services:

  ghost:
    image: ghost:4-alpine
    restart: unless-stopped
    ports:
      - 8080:2368
    environment:
      # see https://ghost.org/docs/config/#configuration-options
      database__client: mysql
      database__connection__host: 107.152.41.231
      database__connection__user: 'bob'
      database__connection__password: 'changeme'
      database__connection__database: ghost
      # this url value is just an example, and is likely wrong for your environment!
      url: http://www.thinkmelt.com:8080/
      # contrary to the default mentioned in the linked documentation, this image defaults to NODE_ENV=production (so dev$
      #NODE_ENV: development
ghost blog will have a sorta contorted SSL / to Non-SSL configuration but it will work:
The comment blog section may not work or add users. Ghost blog seems kinda engineered carefully to break unless you are on the subscription for them.
