Hacker Trapping (part 1) - Setting up a Cowrie for funsies:
In this article we revisit building a cowrie honeypot in order to capture hackers live..


In this article we covered the basic installation of a Cowrie Honeypot. They are so fun (and since we have a 'left-over' crap server that we have paid for - for a year) - why not put it to good use. The goals:
- Live broadcast the exploits to another page as hackers punch the fake system.
- What is not to love! It is entertaining to watch real-world hackers wasting their time on fake porridge.
- Installation specifically requires Python3.9. If you are running Centos it is not native but the guide shows how below.
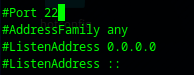
In the installation to truly capture the scanners we need to 'move' our ssh port away from 22 to something different, therefore:
sudo nano /etc/ssh/sshd_configAnd then uncomment your port, changing it to something other.
After that restart your sshd daemon with:
systemctl restart sshd && systemctl status sshd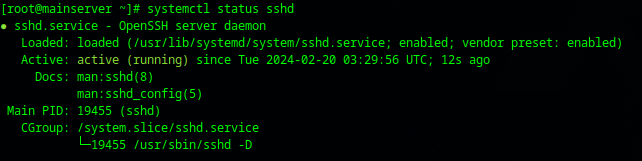
Additionally you will need to allow your firewall to pass through on the new port.
- If you have SELinux consider trying:
semanage port -a -t ssh_port_t -p tcp #PORTNUMBER- If you have ufw consider trying:
ufw allow <new port> && systemctl restart ufwNow when you want to access your VM you will need to do it from the new port as in:
ssh -p <new port> root@123.123.123.123 # Or whever your VM is.Now that sshd is 'moved' out of the way, it is standard for cowrie to run on port 2222 therefore we need to do a bit of plumbing to re-route anything coming in on port 2222 to port 22.
iptables -t nat -A PREROUTING -p tcp --dport 22 -j REDIRECT --to-port 2222Now we can get on with installing Cowrie - we are following the basic installation guide from here:
- If you are using apt-get:
sudo apt-get install git python3-virtualenv libssl-dev libffi-dev build-essential libpython3-dev python3-minimal authbind virtualenvAnd some more packages if you are using yum, namely:
sudo yum install epel-release -y
sudo yum install git -y
sudo yum install python-virtualenv -y
sudo yum install openssl-devel -y
sudo yum install libffi-devel -y
sudo yum install curl wget -y
sudo yum install gcc gcc-c++ kernel-devel make -y- If you are using yum (hint - paste this into file.sh && chmod +x file.sh && ./file.sh)
- It looks like one requires Python 3.9 which is not part of Centos 7/8? Therefore:
sudo yum install wget -y
wget https://www.python.org/ftp/python/3.9.18/Python-3.9.18.tgz
tar -xvf Python-3.9.18.tgz
cd Python-3.9.18
./configure --enable-optimizations --prefix=/usr/local --enable-shared LDFLAGS="-Wl,-rpath /usr/local/lib"
sudo make altinstall
Once you have done this one can then work from the python3.9 command set.
pip3.9 install --upgrade pipHopefully that should cover the packages, we will update this if we miss one..
Now we will add the user cowrie (as root) - setting the password to something difficult to prevent it from being compromised itself.
adduser cowrie && passwd cowrieAs cowrie:
sudo su - cowrieAnd then:
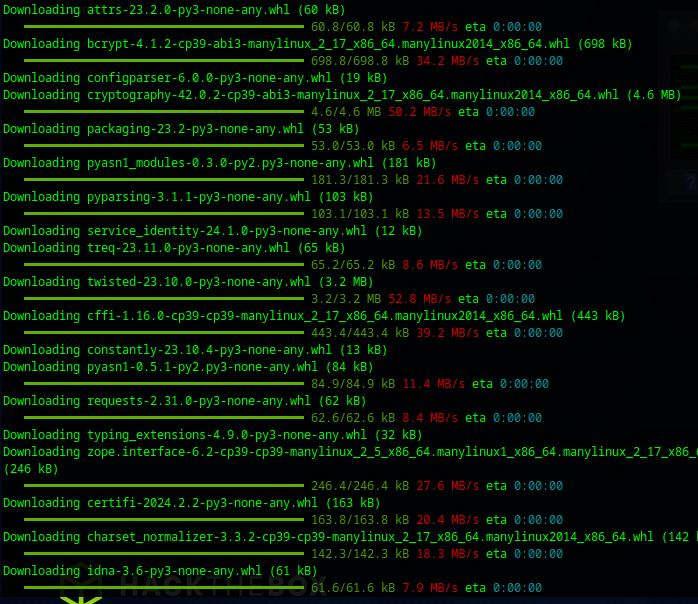
git clone http://github.com/cowrie/cowrie
cd cowrie && pwd
Now we need to create our virtual environment (as user cowrie)
# Note if you did not execute sudo python3.9 -m pip install virtualenv above this will not work.
python3.9 -m venv cowrie-env
source cowrie-env/bin/activate
python3.9 -m pip install --upgrade pip
python3.9 -m pip install --upgrade -r requirements.txt   # OR
python3.9 -m pip install --upgrade -r cowrie/requirements.txt
python3.9 -m pip install wheel
# This is required specficially...
python3.9 -m pip install urllib3==1.26.6
Note: Once you have typed the source command any python3.9 -m pip upgrades will only apply to that specific environment (in our case inside cowrie-env)
NOTE: If you try python3.6 you will have a pile of problems on this installation.
If you installation is clean (using python3.9) it will work first shot as in:
Ok phew - messy long install but it is working.
To start it:
./cowrie startIt drops back to prompt but it is there, we get in with bogus credentials at the second password attempt:
ssh root@<honeypotip>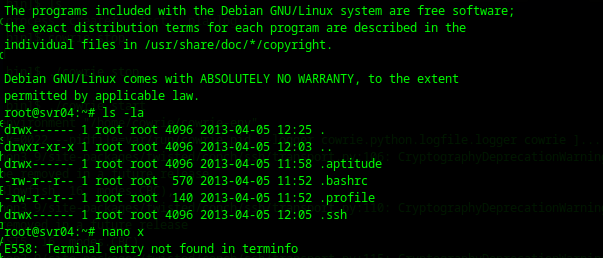
Next in Part II we will then look at back-piping the logs to a live screen docker on another machine..
